The good news is that you probably already have the equipment you need.
The majority of my students use a laptop or tablet for their online lessons.
CAMERA/VIDEO REQUIREMENTS
I need to be able to see the following:
Practically speaking, this can be accomplished with any camera (e.g. cellphone, tablet, laptop, or webcam) but it's the placement which is important. I'll cover that in more detail below, and have included some example setups so you can get some ideas on how to best configure your online piano lesson environment.
You have the same requirements. When I am demonstrating something you need to be able to clearly see what I am doing. This is where a screen larger than a cellphone is beneficial. Ideally you will not have to move from your position at the piano, or move the camera (the cellphone in this example) to watch me demonstrate something.
VIDEO CONFERENCING SOFTWARE (Skype)
I use Skype for delivering Online Lessons.
Skype is available for free on a variety of platforms (Windows, Mac & Linux computers, Android and Apple phones, and various tablets) and hence should be something that most of my students can access. It’s even available for Xbox gaming consoles if that works better for you.
To get it, search for Skype in the appropriate store or via a web browser. Note: if it says ‘Skype for Business’ that is NOT the edition you want.
You will need to create an account to use Skype, and then we will need to 'find' each other in the application. I will help you with this at the appropriate time.
MICROPHONE/AUDIO REQUIREMENTS
This one is pretty easy - most of my students do not use separate microphones i.e. they use a device which has a combination of camera and microphone. Fortunately, the ideal placement for the microphone is also a good location for the camera so audio quality is generally not an issue.
INTERNET CONNECTION
A reliable internet connection is important, and there are several components to this.
- 1The connection to the Internet Service Provider. My studio has a Broadband Fibre Gigabit connection, however you won't need anything like that speed at your end. We will be using Skype for the lesson and the recommended bandwidth requirement is 1.5Mbps. Ideally you would have a faster connection than this, as internet plans rarely meet their specified bandwidth in my experience.
- 2The connection between your device and your modem/router can be a factor. Ideally your device would have a wired (Ethernet) connection to your router as it is the most reliable connection, and provides the fastest speed on your home network. My studio equipment is connected this way, but this may not be practicable in your situation. Unfortunately, wireless networking is not uniform throughout a building and if you are planning on using a wireless device for lessons (as most of my students do) you will need to ensure there is good network connectivity at the piano.
- 3Internet congestion or disruption. The effects of congestion can be mitigated to some extent by having a higher speed connection to your ISP (see #1 above) but sometimes the world just conspires against us, and factors outside our control can affect a lesson. Please see the Studio Policy page for how this is handled.
WHICH PORTABLE DEVICE IS BEST?
If you are lucky enough to have more than one device you can choose to use, which should it be? My recommendation is to try the device with the largest screen first. It will probably have the faster processor, better camera and other components which are necessary for a good video lesson experience.
What are other students using? In my last survey, more than 95% of my Online Students use either a laptop (61%) or tablet (34%).
CAMERA PLACEMENT
The ideal placement for the camera (and microphone) is at the right hand end of the piano looking down the keyboard, and at a height that allows most of the keys to be seen along with the upper part of the body. I've included several examples below, showing how the device has been placed and the view that I see via Skype. Hopefully this will give you some ideas on how you can best utilize the equipment you have to get a good setup for online lessons.
Sometimes the right hand side of the piano simply isn't feasible; there may be a wall in the way or perhaps the camera will be facing a window. This is the case in my Studio, so to make it easier on the eyes of my students (and to avoid pulling the curtains and spending all day in a cave) I've situated the side camera on the left. The only potential issue with situating your device on the left is the effect on audio. Depending on the microphone, it can be harder to hear the finer detail of the treble notes when the device is at the bass end of the piano.
Laptop side placement
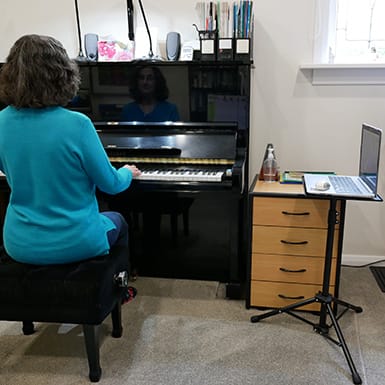
Jane's view via Skype
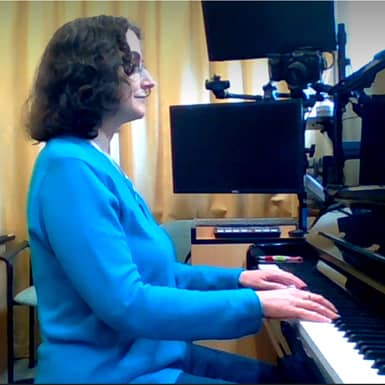
This device and placement is very good. The Laptop screen is large enough for the student to easily see me demonstrating, and the placement (out from the keyboard, and slightly higher) means that I can see both hands on the keyboard and how the body moves while playing. In this example I've pulled the curtains - compare that with the next example to see the effect where the camera is facing a window.
This setup uses a specialized Laptop Stand, however with some kiwi ingenuity you can achieve similar results with household items. I've included some example setups below, to get your creative juices flowing. The key thing to remember is that you need to be able to easily see me demonstrate, preferably without straining your neck, and I need to be able to see you as in the example above.
WEBCAM/LAPTOP PLACEMENT
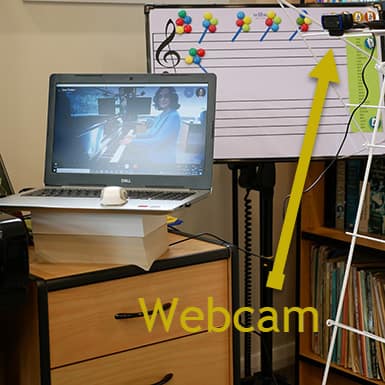
JANE'S VIEW VIA SKYPE
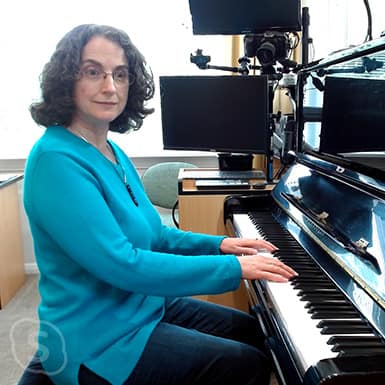
This setup is excellent - both the student and teacher are able to easily see each other. With a webcam, you can mount it in the ideal location and put the laptop at a better viewing angle. I decided to channel my inner MacGyver so the webcam is sitting on a 3B1 notebook which sits across a couple of spans on a clothes airer. Balancing the laptop on a pile of books to get a nice height for viewing seemed appropriate for the example, although caused my 'techie' husband some stress.
8" TABLET PLACEMENT
JANE'S VIEW VIA SKYPE
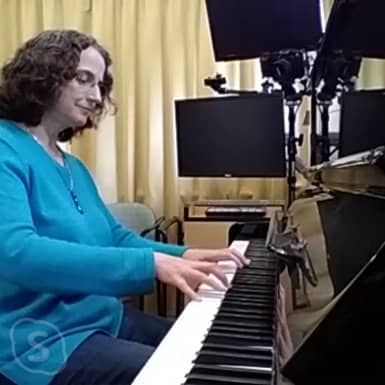
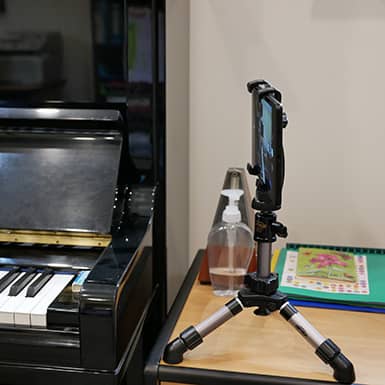
This setup is acceptable; It has a good view of the keyboard and most of the body is visible. Ideally the tablet would be more perpendicular to the piano, but that is not really possible from where the tripod is sitting without losing the view of the student. A good option in this example would be to pull the unit beside the piano out from the wall so the tablet can be in a better position. It makes use of a small tripod with a cheap (~$15 as I recall) tablet mount. The same mount could be attached to standard camera tripod and moved out from the piano to the optimum position for viewing the student and keyboard.
8" TABLET PLACEMENT
JANE'S VIEW VIA SKYPE
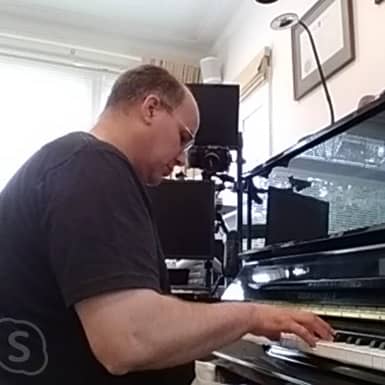
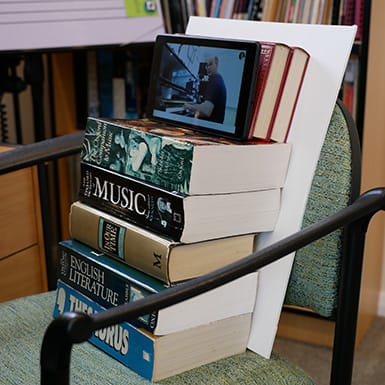
If you don't have a tripod and tablet mount, then a chair with a pile of books can get a reasonable result. It's an acceptable setup, but ideally the tablet would be a little higher and also tipped forward a bit (tricky without a mount) so that it was looking down on the keys.
CELLPHONE PLACEMENT
JANE'S VIEW VIA SKYPE
View when phone perched
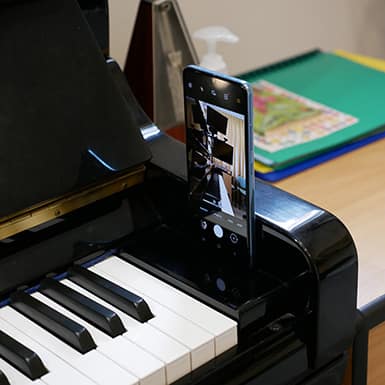
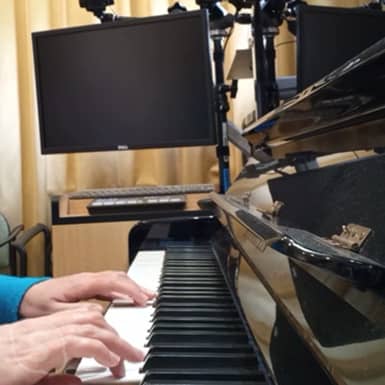
This setup is not recommended. For the occasional online lesson when sick and unable to attend in person, it is workable, but as you can see, the vertical alignment cuts off all the body from view. In horizontal alignment, the arms are viewable, but parts of the keyboard and head/shoulders are not. Another issue with this setup is that inevitably the student will need to pick up the phone to view a demonstration and then spend time attempting to get the phone balanced and orientated again.
SUMMARY
Long story short, you will get a good online lesson experience with a laptop or large tablet situated at the right hand end of piano with the camera offset from the front of the piano.
It is a little more complex than that, so if you have jumped straight to this point, make sure you read up on camera placement above - it's important - before starting lessons.
